Sunday, May 2, 2010

Science Room


This is the final version of the Science Fiction room. I did not like the way the robots eyes looked, so I reshaped the eye and made him a cyclops. The two shaders that I wrote were for the glowing of the buttons and for LCD screens. I originally did the screen for mental ray, so that I could see what I wanted to try to achieve in Renderman. This is why I decided that I needed to figure out a way to make the buttons glow. Unlike clicking a button for a mental ray shader, the glow has to be a completely separate object, specifically a sphere. The LCD screens actually started as a shader for the robot. I was tweeking and tweeking when it started to look more like an LCD screen. The element that really made me think it looked like a LCD screen is the way the screen looks at different angles. I really wish that we would have had more time to work on this project or the Renderman would have been installed sooner, because at first it was hard to work with, but like anything the more I worked with it the easier and more interesting it became. The types of shaders that can be made or attempted render at very fast rates, especially when compared with mental ray. I did run into a problem with the quality tab under the Renderman render settings. I didn't want to reveal for me. I could access every other tab in the render settings except the quality. At first I was have smoothing issues with shadows and the only way to fix it was under the quality tab. I had to open the Maya scene file in a text editor and find the specific quality setting and adjust it that way. I then saved the file as a new iteration and opened it up to see if it worked and it did. I'm pretty happy with the results of the final image.


This is the AO pass. Images like this make me want to make a complete film with nothing but an AO pass. Stunning.


This is how the scene looks in Maya. The speres for the glow shader look weird and at times were hard to place properly, but the desired look made it worth the time and effort.

Tuesday, March 30, 2010

Bedroom

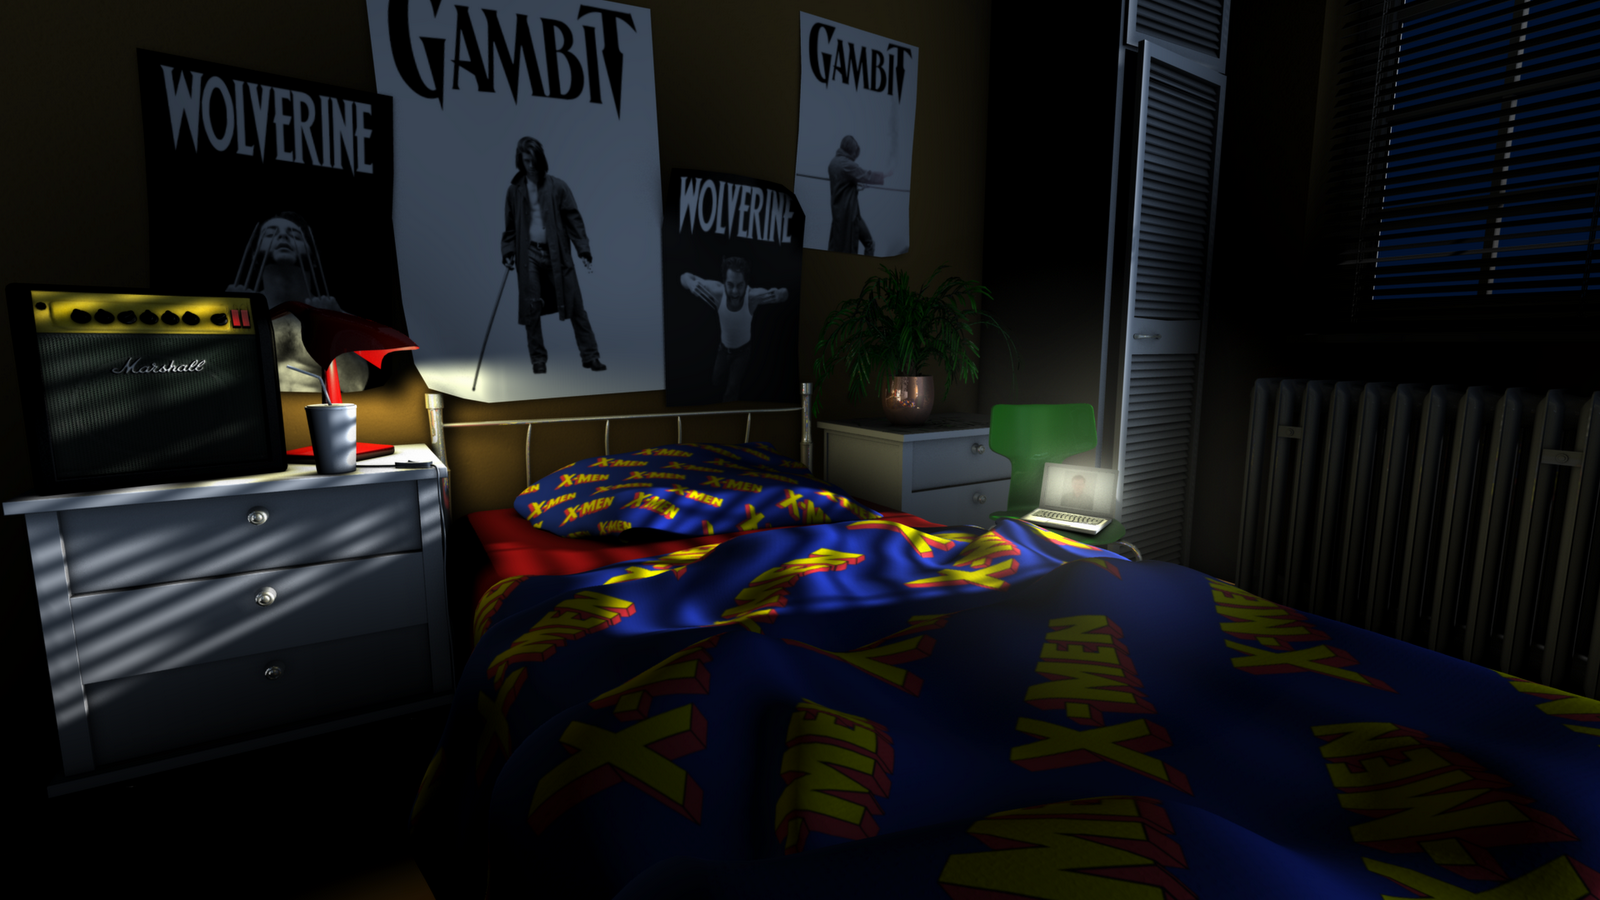
This is the final look of the room. The lighting was actually very simple, only a few lights. I used depth map shadows for everything.


This is a final shot of room without the guitar.


This is a final detail of the amp.


This is the ambient occlusion pass. A fellow class mate showed an extremely simple way to make this pass possible. It added very subtle detail but in my opinion necessary. It really added depth to the blinds and made the guitar strings seem to pop!


This is a view of the bedroom from Maya.


I never had a Marshall amp but I always wanted one to go with my guitars. This bedroom scene was my chance to finally have one. I really wanted the amp to look as real as possible so I researched all the proper textures. The amp probably took me the most time to complete, because it seemed that my mania knew no end!


This is the texture and bump map used for the amp screen. I really wanted the Marshall font to have the proper look and feel, so I made the font have a slight bevel that would show up only on the bump map. This is why the font looks raised and just like a real Marshall amp.


This is the texture that I made in Photoshop for the metal knob board of the amp. I wanted it to have the brushed gold look of a real Marshall amp.


This texture was painted in Photoshop after exporting the guitar body as an obj.
I wanted the guitar to look real but the problem was in how the model was made. The body and neck were all one piece, which in real life is not the way guitars are made. Knowing this I decided to make the whole guitar have an all wood finish because fret boards are not painted on guitars.


Image used for texture on bedspread and pillow case. This image was made in Photoshop.


Image used as bump map for walls.

Tuesday, March 2, 2010

The King's Treasure


Above is the final image of the King's Treasure. I wanted to make the goblet look as if it was filled with all of the diamonds, but was knocked over, so they all spilled out. The idea of the spill out was to really attract attention to the refraction of the diamonds. I also wanted the little bits of light in the scene to be mostly reflection and refraction with no visible source of light. I am happy overall with the look, but the true caustics and the coins still bother me.


The above picture is what the scene looks like in Maya. There were times when it was hard to see certain items because in the Maya view they were almost invisible. So, for positioning purposes, I would give them an opaque texture and then after they were placed properly in the scene, I would then apply the intended texture.


The above picture is what the caustic settings were put on in order to achieve the look that I have. I still don't have the true caustics from the diamonds but the settings that I have the caustics set on, are an improvement than the scene without them. I found that by pulling the scale down to almost nothing it made for a more realistic look with the specular and the refraction. If it was all the way up in the white, everything looked blown out and almost overexposed. This took some tweeking in order to make it look more real.


The above picture are the settings that I had for the diamonds. I decided to have a few different colors just to add some variation in the scene. I took the basic diamond texture and changed the colors. I also had to very carefully adjust the reflectivity, roughness, highlight size, and most of the refraction options under the raytracing menu. It was a combination of all of the adjustments that gave the final look, not just turning on refractions.


Most people on this project were having problems with the table cloth texture. It may not have been mentioned during the critique, but everyone was talking about it in the lab when they were working on it. Either the geometry was not right on the table, the normals were off, or I don't know what! All I know is I tried a few ways to make the table look good. I first tried to paint it in photoshop, but the level of detail just was not good enough. I then tried a bump map with the Maya cloth texture. Once, again, it wasn't detailed enough and it just looked extremely weird. I also tried to make the table reflective in some way. I put on some of the reflective textures that I already had, but it didn't seem to fit in with all of the other stuff on the table. I finally was able to get the table looking better by adding a bump map with the Maya leather texture. I adjusted the texture a bit to give the proper bump depth, and made the cells a bit smaller. It seems that sometimes, the simpler solutions are the better ones.


The above image is the graph network for one side of the coins. I tried to use real coin images, but they looked horrible. They were just too gray or too black to use a bump map on. So, I made my own image and it looks a lot better, I think. I still am not completely happy with the way the coins turned out, but I can't seem to get them much better than this.


The above image is the reverse side of the coin.


At first, I hated this project and didn't think I would be able to pull it off as well as I did. Each of these projects have really taught me more than I would have learned by myself. I find that while being in the studio while others work on the same project helps as well. One person will be working on a texture and ask another's opinion, or someone will send everyone a link to a good tutorial for making a texture or to help with lighting. The learning process is better this way then just reading a book.

Thursday, February 11, 2010

Texturing!

This is the finished work for the first texturing project. I found it to be very informative to do this project. I was able to learn a great deal by asking the others around me, watching tutorials, and looking for help on the internet. Most of the class tutorials didn't help much but the actual project itself was why I learned as much as I did.


This is the final camera view in Maya before rendering.


One of the most helpful ways to texture for me, was the ability to use Photoshop. I took the banana and did an automapping of it, then exported it into Photoshop as an obj. I then found an image online and was able to project and paint the image onto the model. It was then exported back into maya as an obj. There are endless ways to do it, but this worked fine for this project. If given more time, I would have most likely tried a bit more of a lengthy aproach, only to have specific and direct control of the details.


This is work flow for the banana. At first the way of thinking in nodes for maya was confusing, but once I figured it out, it was a piece of cake.


Pear


Apple


The orange was done procedurally. Again once, I was able to figure out the nodes for Maya it was much easier to do this. After the connections were made it was just tweeking and that takes a long time!


Figuring out how to do the subsurface scattering was as easy as looking up a tutorial online. I did this so I could keep going back and referring to it, step, by step. The tweeking was the hardest part. It took a few hours to get it to look even half way decent. Moving the lights really helped to achieve the proper look.


These are the adjustments that took hours!

Sunday, November 29, 2009

Stabilization, Tracking, and Matchmotion

Stabilization:

The track that was given was all over the place as far as camera movement goes. In order to fix the final track, I had to use both a Stabilize node and a Smoothcam node.


For the Stabilization node I used two separate points to track the movement of the camera. I also made sure that my SubPixelResolution was set to 1/256 as a way of better tracking the pixels. This helped to get rid of extreme jitter in the track but was still not what I envisioned.
In order to achieve a better overall stabilization, I used the Smoothcam node. I found a point to track and analyzed it in two different ways. I found the normal way to be good, but I wanted to see what the high analyze would do, so I tried that as well. The high analyze took almost 20 minutes to complete, but I felt it was a better looking clip once this was done.

http://vimeo.com/7799687

Tracking:

For Tracking I also used the clip that was given. I thought it would be funny to take a video of myself in a tank top and shorts for this cold snowy mountain environment.


After I shot this video of me outside (for better lighting), I was then able to pull the key.


After pulling the basic key, I needed to resize and roto out the parts of the background that didn't work.


I then used Matchmove node in order to place myself into the image. I found it hard because the clip that was given was of pretty bad quality. I had to deinterlace the clip in order to try make it the quality not look as bad and to get a better track. I also had a hard time trying to make my clip, which was shot in HD look as bad as the background clip.


Overall the quality of the clip limited the final output, but I was able to track the clip well and get a pretty decent looked final piece.


http://vimeo.com/7801765


Matchmoving:

For my Matchmoving, I thought it would be funny to have some guns in the lab. I don't really know why I think that this kind of thing is funny, but I do.

I first shot the footage I needed of the lab.


I found some guns on Turbo squid and brought them into Maya so that I could try to get the perspective and lighting right, and to also pull a key for them.


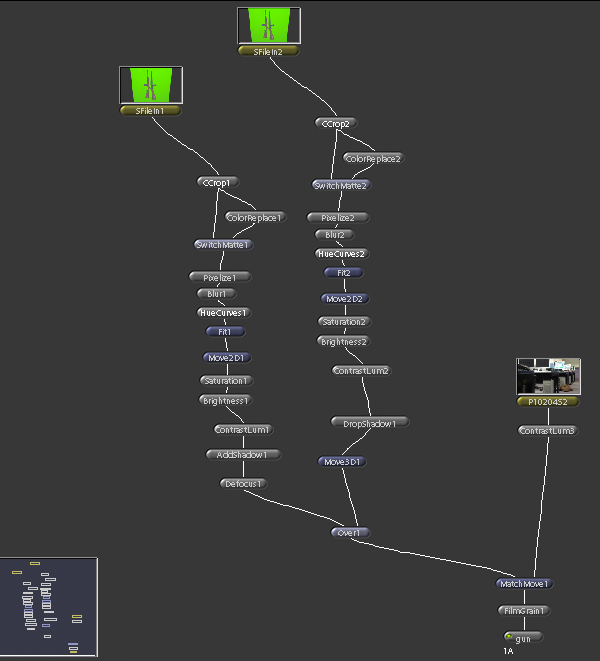
I then brought them into Shake and used the ColorReplace, and Switchmat nodes in order to get the key that I wanted.


I then used the Matchmoving node to track the markers that I put on the wall in the original clip. I also had to use a good number of nodes to try to get the color and shadow to look correct.


The final clip is pretty good and I think is pretty funny as well.


http://vimeo.com/7799546

Tuesday, October 27, 2009

Live on Live: Vegas

Original


Composited

http://vimeo.com/7296721

I took this screen shot into Photoshop and used it as my base to help get rid of the lights and the Nevada text.


This is the layer in Photoshop that was put onto of the above picture.


This is the image after the layer was applied. This image also has the flickering "C" that was animated in Photoshop.


The layers below are the frames used to animate the "C"


The image with the animation was exported out of Photoshop as a .mov, and then put into Shake. This is the final Shake tree that was used.


There was no need for an Alpha with this composite.

CG on Live

Original


Composited

http://vimeo.com/7296770

This is the playblast that was made from animating a leaf in Maya.


This is the Alpha.


This is the final Shake tree


Live on CG

Composited

http://vimeo.com/7298225

This the video that was shot in front of the green screen.


This is an image of a CG jungle background that I found on the internet.


This is the Maya model of the watchtower. This was found on the internet for free.


This is the Maya model of the sniper rifle. This was found on the internet for free.


This is an image of all of the models and the jungle background together in Maya.


This is the rendered version of the Maya file.


This is the Alpha.


This is the final Shake tree.