Sunday, November 29, 2009

Stabilization, Tracking, and Matchmotion

Stabilization:

The track that was given was all over the place as far as camera movement goes. In order to fix the final track, I had to use both a Stabilize node and a Smoothcam node.


For the Stabilization node I used two separate points to track the movement of the camera. I also made sure that my SubPixelResolution was set to 1/256 as a way of better tracking the pixels. This helped to get rid of extreme jitter in the track but was still not what I envisioned.
In order to achieve a better overall stabilization, I used the Smoothcam node. I found a point to track and analyzed it in two different ways. I found the normal way to be good, but I wanted to see what the high analyze would do, so I tried that as well. The high analyze took almost 20 minutes to complete, but I felt it was a better looking clip once this was done.

http://vimeo.com/7799687

Tracking:

For Tracking I also used the clip that was given. I thought it would be funny to take a video of myself in a tank top and shorts for this cold snowy mountain environment.


After I shot this video of me outside (for better lighting), I was then able to pull the key.


After pulling the basic key, I needed to resize and roto out the parts of the background that didn't work.


I then used Matchmove node in order to place myself into the image. I found it hard because the clip that was given was of pretty bad quality. I had to deinterlace the clip in order to try make it the quality not look as bad and to get a better track. I also had a hard time trying to make my clip, which was shot in HD look as bad as the background clip.


Overall the quality of the clip limited the final output, but I was able to track the clip well and get a pretty decent looked final piece.


http://vimeo.com/7801765


Matchmoving:

For my Matchmoving, I thought it would be funny to have some guns in the lab. I don't really know why I think that this kind of thing is funny, but I do.

I first shot the footage I needed of the lab.


I found some guns on Turbo squid and brought them into Maya so that I could try to get the perspective and lighting right, and to also pull a key for them.


I then brought them into Shake and used the ColorReplace, and Switchmat nodes in order to get the key that I wanted.


I then used the Matchmoving node to track the markers that I put on the wall in the original clip. I also had to use a good number of nodes to try to get the color and shadow to look correct.


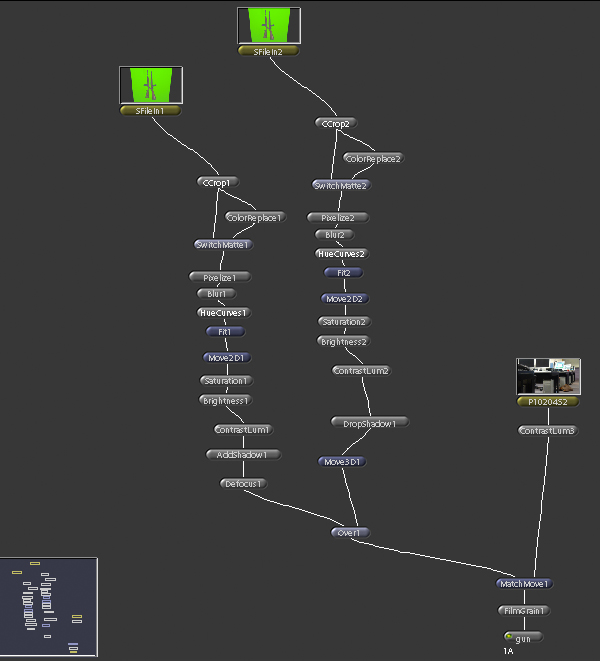
The final clip is pretty good and I think is pretty funny as well.


http://vimeo.com/7799546

Tuesday, October 27, 2009

Live on Live: Vegas

Original


Composited

http://vimeo.com/7296721

I took this screen shot into Photoshop and used it as my base to help get rid of the lights and the Nevada text.


This is the layer in Photoshop that was put onto of the above picture.


This is the image after the layer was applied. This image also has the flickering "C" that was animated in Photoshop.


The layers below are the frames used to animate the "C"


The image with the animation was exported out of Photoshop as a .mov, and then put into Shake. This is the final Shake tree that was used.


There was no need for an Alpha with this composite.

CG on Live

Original


Composited

http://vimeo.com/7296770

This is the playblast that was made from animating a leaf in Maya.


This is the Alpha.


This is the final Shake tree


Live on CG

Composited

http://vimeo.com/7298225

This the video that was shot in front of the green screen.


This is an image of a CG jungle background that I found on the internet.


This is the Maya model of the watchtower. This was found on the internet for free.


This is the Maya model of the sniper rifle. This was found on the internet for free.


This is an image of all of the models and the jungle background together in Maya.


This is the rendered version of the Maya file.


This is the Alpha.


This is the final Shake tree.

Saturday, September 26, 2009

Project 2

This is the all live action foreground/background piece that was originally going to be my final. This was made using Shake. I really wanted this picture to blow my last Terminator image out of the water, so I decided after trying it on Shake I would do the final piece in Photoshop, because I would need a lot more time to do it properly in Shake.

This is the background that I used. The image was taken in the basement of Fike.

Here is one of the two images that I used for myself in the image. I needed two images so that I could actually make the legs look like the were not standing on anything. I had to rotoscope myself out of the background.

Here is the second image I used to make the complete, me.

After I did the roto in Photoshop, I made the background blue. I had to do this because my shoes are the same shade of green as the green screen color.

Here is the Alpha channel of that image.

This is the image the I used for the Terminator. I shot him against the green screen. It took me a while to get the right angle and the right amount of light to match the background image that I took, but I was finally able to get it right, after two shootings.

This is the Alpha channel for the Terminator.

I had to roto the foreground part of the background image so that it would look like the Terminator was actually standing at the bottom of the steps. After that I made the background blue so I could pull the key.

This is the Alpha.

This is the final image done in Photoshop. I chose to use Photoshop, because it would be easier to blur certain parts of the image, burn and dodge others while still keeping the images all on separate layers.

Below are a series of images that show the progression of work and the different layering methods used in Photoshop. One with the background and one without.


This is the layers menu.

Below is a comparison of the Shake image on the left, with the Photoshop image on the right.

This is the final image for the second piece. Live background, CG object/foreground.

This is the background that was used. It is a picture of my living room while my wife and I are still trying to unpack from moving in.

This is the image that I wanted to use for my CG foreground. It is a vase made for 807. I brought in the background image into Maya and used it to help me get the lighting and placement correct.

Since I was having problems with Maya, I just brought the above image into Photoshop and used the magic wand to select and delete the gradiant background.
This is the image with a green background to help with pulling the key.

This is the Shake tree.


This is the final image for the CG background, live foreground. I found this one to be really hard to pull off without looking horrible or stupid. I tried to make it looks as if I was in some sort of tunnel looking for a way out.

This is the image the I used for the live forground.

This is the image after the key was pulled.

Here is the Alpha of that image.

I decided to give myself a little bit of a red-ish hue. I thought it would add to help the image look more movie like.

This is the tunnel that I made in Maya to use as my CG background.

This is the inside of the tunnel with the perspective that I wanted for my image. I added two lights to the inside of the tunnel. One was more of an ambient light just to help show the location of where I was. The other light was a spot light and it was used to help simulate the light was that coming from the flashlight was I was holding.

This is the tunnel after I applied just a dirty stone texture map.

Here is what the tunnel looked like when it was rendered without me in the image.

This is the Shake tree.


I found that doing each one of these presents it's own problems. Each have to be thought out in their own way. I also realized that by limiting myself to just using Shake, I would not make images that were not what I considered to be good. I had to use Photoshop for the first one to make it look real. For the second image I just had to use it to help me pull a better key. The third image was done completely in Shake and that may be why it's not as good as the other two. I think the third image holds up a bit better than some of the examples that were shown in class.